Thursday, April 10, 2014

What's the ultimate aim of education?

I am sure everyone ponders over this question at some point in life. A child in school probably thinks of in-class time as a waste of time, considering that she has a lot of exciting things to do outside the four walls. A teacher in the same classroom is concerned about completing the prescribed content and schedule within the limits of time. The parent at home is mostly at ease with the fact that the child is in school while he goes on with his daily chores.

The one entity that gets impacted more than anyone else, and that, unfortunately, has the least power to influence the whole process, is the Society. The human civilization has, over the ages, come to terms with the fantasy that education (or, simply, bringing up a child) is an individual's responsibility. To be fair, states do put in a lot of emphasis on making their presence felt by controlling the essentials, namely, the finances and the "rules of the game".

What happens at the end of one's education is something that hits the society like a fireball. You get people who don't want to work on something, but they must- for whatever reasons! You also get people who are not able to cope with the real-world pressures and display behaviours that don't exactly gel well with others. The education that was supposed to produce "good human beings" suddenly begins to look as if it had all the right things in place, yet without a heart. In some countries, I am told, schools begin with social etiquettes and then with the alphabet. I wonder if they "fail" a child for not passing the first phase. What does a child do if she can't fathom the "selfishness" in her demanding the cookie of her brother? Or what does a teacher do on seeing a "hyper-active" child trying to jump over another child in the class and hurting himself in the process?

Do we really have a choice to not make good human beings more than anything else? And who should be doing this more than anyone else in the whole cast? Should we hold someone else accountable when a young male in the streets makes obscene overtures towards a girl? Or when an adult hits a child at the roadside because the child was "tampering" with this expensive car's side-view mirror? Or when a religious "jagrata" in the neighbourhood keeps you from sleeping peacefully for the whole night?

I fantasize about a day when brain-mapping technology would advance to a level when it identifies a suspect behaviour in a child at the age of four and provides help to its hapless (and often, defensive) parents. Until then, we need to help the society in bringing up the right next generation into its fold by giving preference to "bringing up" than "educating".

Friday, June 17, 2011

Reinvent the paper airplane

We are sure you would have made and flown a paper airplane someday. Did it fly the way you had wanted it to fly? If it didn't, what did you do to correct the flight? Well, lets go back to our science classes and try to decipher the code. Here's the interesting activity to make the perfect airplane:


Activity Objective:

To build different paper airplanes that can fly longest or highest or most elegantly

Learning objectives:

1.       Understand airplane design and its various components

2.       Explore different airplane designs and find their individual qualities

Material needed:

1.       Sheets of paper (preferably, used but unfolded ones)

2.       Scissors (if needed)

3.       Paper clips

Process:

Let the children make all kinds of designs they know of with sheets of paper. Encourage them to use different thicknesses of paper right from a newspaper to a standard A4 size paper to a chart paper. Let them make different sizes of airplanes. To add some flavor of interest, ask them to name their designs based on their flight patterns. Some common names could be fighter, glider, elegant, diver etc.

Hold competitions like highest, longest and most elegant flight.

Factors to be varied and studied:

1.       Paper thickness

2.       Size of the airplane

3.       Angle of the wings

4.       Tail direction (does it work like radar?)

5.       Launch speed

6.       Launch angle

7.       Weight on the nose, tail, wings (attach paper clips)

Some images of paper airplanes:

Here's a video of children enjoying the flights of their own paper planes:

Some of the excellent images that we found on the internet are reproduced (with their sources) here:

1. DC-3 of paper airplane (http://www.zurqui.com/crinfocus/paper/airplane.html)

Another great design we found goood to make is at http://seedsottawa.files.wordpress.com/2011/03/paper-airplane.jpg:


For some technical aspects of designing the right airplanes, lets look at an excellent discussion on aerodynamics at http://teacher.scholastic.com/paperairplane/airplane.htm.

Aerodynamics

What makes a paper airplane fly? Air — the stuff that's all around you. Hold your hand in front of your body with your palm facing sideways so that your thumb is on top and your little finger is facing the floor. Swing your hand back and forth. Do you feel the air? Now turn your palm so it is parallel to the ground and swing it back and forth again, like you're slicing it through the air. You can still feel the air, but your hand is able to move through it more smoothly than when your hand was turned up at a right angle.  How easily an airplane moves through the air, or its aerodynamics, is the first consideration in making an airplane fly for a long distance.

Drag & Gravity


Planes that push a lot of air, like your hand did when it was facing the side, are said to have a lot of "drag," or resistance, to moving through the air. If you want your plane to fly as far as possible, you want a plane with as little drag as possible. A second force that planes need to overcome is  "gravity." You need to keep your plane's weight to a minimum to help fight against gravity's pull to the ground.

Thrust & Lift


"Thrust" and "lift" are two other forces that help your plane make a long flight. Thrust is the forward movement of the plane. The initial thrust comes from the muscles of the "pilot" as the paper airplane is launched. After this, paper airplanes are really gliders, converting altitude to forward motion.

Lift comes when the air below the airplane wing is pushing up harder than the air above it is pushing down. It is this difference in pressure that enables the plane to fly. Pressure can be reduced on a wing's surface by making the air move over it more quickly. The wings of a plane are curved so that the air moves more quickly over the top of the wing, resulting in an upward push, or lift, on the wing.

The Four Forces in Balance


Long flights come when these four forces — drag, gravity, thrust, and lift — are balanced. Some planes (like darts) are meant to be thrown with a lot of force. Because darts don't have a lot of drag and lift, they depend on extra thrust to overcome gravity. Long distance fliers are often built with this same design. Planes that are built to spend a long time in the air usually have a lot of lift but little thrust. These planes fly a slow and gentle flight.

Look out for the next exciting post on Walk-along paper glider...

Friday, June 10, 2011

Making a parachute to save the egg!

On the first day of the unSCHOOL workshop at Sayaji Club, Indore, the children were given the task of making a parachute to land a raw egg safely on the ground from the first floor. The activity looks deceptively simple. But going by the fact that only one group out of seven managed to get it right the first time, you could give it a serious try at home! I borrowed the activity from a training workshop I had attended earlier by Yardstick. We added some bit of our wisdom to it this time.

Here's the activity in detail:

Activity Objective:
To build a parachute to land a raw egg safely on the ground from about 15 feet height (or higher)

Learning objectives:
  1. Understand air pressure and how it can be used while making a parachute
  2. Explore different parachute designs and find the most suitable one

Material needed:
  • Large polythene bag
  • Raw egg (or ripe tomato or any delicate object that may break on falling)
  • Thread
  • Cello-tape
  • Plastic disposable cup

Process:

A parachute works by increasing the surface area of an object so it has more contact with the wind, which decreases the speed of the object. 

Ask the children to make groups of 2-3, and think about any parachutes they had seen in actual or in pictures or movies. Then they should draw the picture of what they want to make.  They should discuss the size and shape of the polythene, length of thread and the height from which they will drop the parachute. They should also think about how the egg should be placed in the cup. Encourage them to experiment with various factors and not be afraid of breaking the egg.

Factors to be varied and studied:
  1. Changing the payload weight
  2. Lengthening or shortening the length of the suspension lines
  3. Changing the number of suspension lines
  4. Increasing or decreasing the radius of the parachute
  5. Cutting holes and/or slits in the parachute fabric
  6. Shape of the parachute fabric- square, circle
  7. Fabric- polythene, cloth (wet/ dry)
This is how it went!

Making the parachute together
Making the perfect parachute!


Tying up the threads
Waiting for the parachute drop

And here's how we broke 6 eggs before saving the 7th!


Further references:
1.       For some theory on parachutes: http://www.pcprg.com/sptp.htm
2.       To calculate the diameter of the parachute needed: http://celtickane.com/projects/rocketry/project-i-a-successful-parachute/math-and-theory/


Sunday, November 14, 2010

Say Bee!

How do you say "horizon"? Is it supposed to be hawri-zan, horai-zan, hawri-zawn or horai-zawn? That was the question of our session yesterday.

We realized that we have so many different accents of our own, that we don't even know the right way of saying words. So we started to learn how to pronounce. We started with the Dictionary pronunciation key that gives you the different sounds associated with vowels and consonants. below is the key taken from http://www.oxfordadvancedlearnersdictionary.com/pronunciation.html.

Consonants
p pen /pen/
b bad /bæd/
t tea /tiː/
d did /dɪd/
k cat /kæt/
ɡ get /ɡet/
tʃ chain /tʃeɪn/
dʒ jam /dʒæm/
f fall /fɔːl/
v van /væn/
θ thin /θɪn/
ð this /ðɪs/
s see /siː/
z zoo /zuː/
ʃ shoe /ʃuː/
ʒ vision /ˈvɪʒn/
h hat /hæt/
m man /mæn/
n now /naʊ/
ŋ sing /sɪŋ/
l leg /leɡ/
r red /red/
j yes /jes/
w wet /wet/

The symbol (r) indicates that British pronunciation will have /r/ only if a vowel sound follows directly at the beginning of the next word, as in far away; otherwise the /r/ is omitted. For American English, all the /r/ sounds should be pronounced.

/x/ represents a fricative sound as in /lɒx/ for Scottish loch, Irish lough.
Vowels and diphthongs
iː see /siː/
i happy /ˈhæpi/
ɪ sit /sɪt/
e ten /ten/
æ cat /kæt/
ɑː father /ˈfɑːðə(r)/
ɒ got /ɡɒt/ (British English)
ɔː saw /sɔː/
ʊ put /pʊt/
u actual /ˈæktʃuəl/
uː too /tuː/
V cup /kʌp/
ɜː fur /fɜː(r)/
ə about /əˈbaʊt/
eɪ say /seɪ/
əʊ go /ɡəʊ/ (British English)
oʊ go /ɡoʊ/ (American English)
aɪ my /maɪ/
ɔɪ boy /bɔɪ/
aʊ now /naʊ/
ɪə near /nɪə(r)/ (British English)
eə hair /heə(r)/ (British English)
ʊə pure /pjʊə(r)/ (British English)

The funny part was knowing about the British and American accents. Dog (in American accent) sounds so much like Daag (in hindi), and the funny sentence This Dog has a Daag made for a good laugh!

We tried to recognize the differences in the way words are spoken differently among us. One of our South Indian friends said "Only" as "one-ly", and another had a tough time saying Horizon. So that became the homework for the week.

At Unschool, we believe we can make that big difference by correcting these accent issues one small step at a time. Some of the great online sources to make a "Say Bee" out of you are:

1. Oxford Advanced Learners Dictionary- by far the most dependable and authoritative one.
2. HowJSay.com- helps to see the word with the preceding and following words, and also translations into other languages like Hindi.
3. Okanagan College- for some great worksheets and online exercises
4. EnglishStudyDirect.com- gives a lot more links for better English learning online

We finally ended up singing (a bit of Karoake-style) a song...one of our favourites- That's The Way It Is by Celine Dion reading along its lyrics online.

Oh, and just in case you are wondering how to pronounce horizon, its something like harai-zun. Listen to it here.

Monday, September 13, 2010

Story about a plant in danger

One day my mother gave me money and said, "Go to the shop and buy some medicine for me." That time, my mother had a cold, so I went to the market. When I reached there, I heard a stranger talking in his mobile phone. He said that he along with his friends were going to cut a plant. I wanted to save that plant, so first, I bought the medicine and gave it to my mother. Then I told her the whole story, and my mother thought of a plan, which I liked. The plan was to first go to the shop again and follow the stranger. My father also came with me. We followed the stranger and reached the plant which was going to be cut by that man. My father could recognize him. He was his old classmate, so my father knew his phone number. Then he called that man and started scaring him. Then he told that he was going to call the police, and he did! So the police came and punicshed that man and gave us a reward of Rs. 1,000. This was a very special adventure for me, and I will never forget this.

(Story Contributed by Samruddhi, 9 years)

Sunday, September 12, 2010

Water Tank Full Indicator


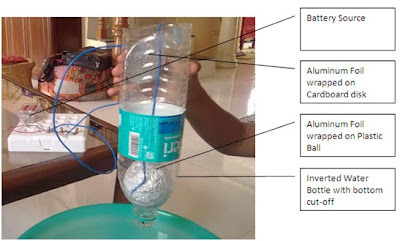
Today, the first prototype of one of the possible solutions to the Overhead Tank overflowing problem was built. More importantly, we were happy about the material used:
  1. Old Bisleri (or any such 1 litre capacity) plastic water bottle
  2. A cheap hard plastic ball a little less in diameter than the water bottle
  3. Aluminum Foil to wrap the ball
  4. Some electrical wire
  5. Bucket
  6. LED/ Alarm
  7. Any type of Batteries
  8. Cardboard or plastic disc 
  9. Thread 

Water Tank Full Indicator


How to do it?
  1. Cut off the bottle’s base (under adult supervision)
  2. Wrap the aluminum foil on the plastic ball.
  3. Strip off both ends of 2 pieces (about a foot long) of an electric wire
  4. Tie one end of one wire to the ball with thread tightly while ensuring that the stripped end is touching the aluminum foil.
  5. Cut the cardboard/ plastic in a small circular shape and punch a small hole close to its centre.
  6. Through a small hole in the bottle (closer to its base), insert the other wire into the hole in the cardboard disc.
  7. Wrap aluminum foil on the disc ensuring that the stripped off end is kept closely in contact with the foil.
  8. Fix up the simple electric circuit as (a) Battery (+) --> disk (b) Battery (-) --> Resistor --> LED(#1), and (c) LED(#2) --> Ball
  9. Test the circuit by touching the ball and the disc together to glow the LED.
  10. Now dip the inverted bottle (without the cap) in the bucket and hold it close to the top.
  11. Fill the bucket and the ball will move up when the water level rises. Once the ball touches the disc, the LED will glow indicating the bucket is full.
  12. The narrow mouth of the bottle prevents the ball from dropping out when the bucket is empty.